
Why you should start calisthenics (demos included)
April 21, 2021
When you hear the words “working out,” what do you imagine? Someone lifting dumbbells or squatting racks in the gym? If so, you’re definitely not alone as this is what comes to most people’s minds. Although lifting weights is the most common way to build muscle, there is also another effective way to do this: calisthenics. Calisthenics is essentially a way to build muscle by utilizing one’s own body weight.
There are many benefits to doing bodyweight workouts versus weighted workouts. Since calisthenics uses your bodyweight, it can be done in many places without the use of a lot of equipment. This can help save time and a lot of money, compared to paying for a gym membership or buying weights (which are really expensive!) to create a home gym. With calisthenics, having access to a pull-up bar and/or dip bar is more than enough to get a challenging workout. I recommend investing in a power tower (what I personally use at home), a doorframe pull-up bar or just finding a park or playground near you that has pull-up and dip bars.
Another benefit to calisthenics is that it’s more fun and looks a lot cooler than lifting weights. When working out with weights, progression is oftentimes based on the amount of weight a person is able to lift. For instance, if I feel like I am able to bench press 120 pounds comfortably, I can just add weight on the bar to increase the total weight to 125 pounds to better challenge myself. Although it’s exciting and fulfilling to hit a certain weight on an exercise, calisthenics has a completely different approach to progressions. If I am able to complete push-ups with ease, I can mix in variations to the traditional push-up (diamond push-up, wide push-up, one-arm push-up, handstand push-up, etc.) in order to make the exercise harder for me. Although it does take effort and commitment to “level up” to the next progression of the exercise, the feeling of “unlocking” a newer and more difficult exercise is indescribable. I still remember the first time I was able to do a wall-assisted handstand (handstand but with the support of the wall), and I was overjoyed. I continued to improve my wall-assist handstands all day long in hopes of being able to do a handstand without assistance one day.
Although there are a TON of different calisthenic exercises ranging from all levels of difficulty, here are just a few to get you started. The list below is organized into four different muscle groups: chest and triceps, back, abdominals, legs. For each muscle group, I have listed a couple exercises (from easy to difficult) as well as a quick description for each one.
Again, make sure to keep in mind that this is merely the tip of the iceberg when it comes to an introduction to calisthenics. If you are interested in calisthenics, the different workouts, progressions and more, I highly recommend checking out YouTube for some great tutorials. THENX, CHRIS HERIA and Calisthenicsmovement are some of my favorite channels.
Chest and tricep exercises:
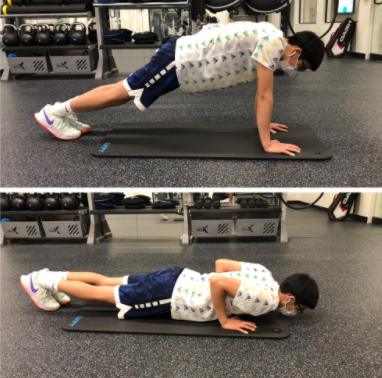
The Push-up
Regarded as one of the four fundamental exercises, push-ups are great exercises to build chest and tricep strength. Push-ups can be modified in many different ways (weighted, variation, etc.) in order to make them easier or harder to do.
Dips
Dips are the second of the four fundamental calisthenic exercises, and are a great way to challenge yourself if the standard push-up becomes too easy. In order to do these, raise yourself on a pair of dip bars, come down so your arm is bent at ninety degrees, then come all the way back up. Dips can also be modified in order to target specific parts of the body and make the exercise easier/harder. For me, weighted dips are a significant part of my workout routine.
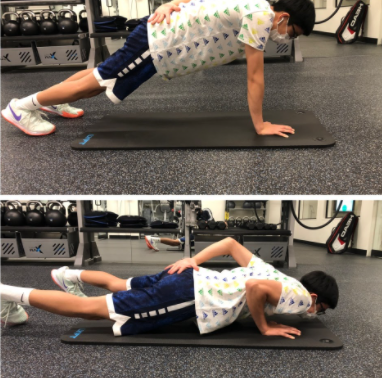
This exercise requires body strength and coordination in order to achieve. The one-handed push-up is still a work in progress for me, as I have only been able to do the eccentric (coming down) part of it. When training to master this, make sure to target both arms equally.
Back & shoulder exercises:
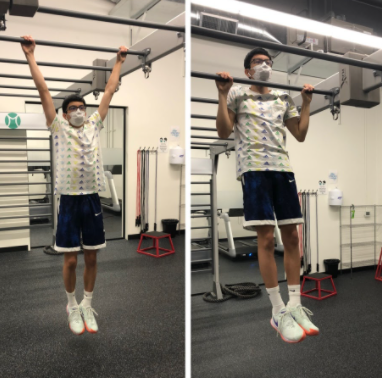
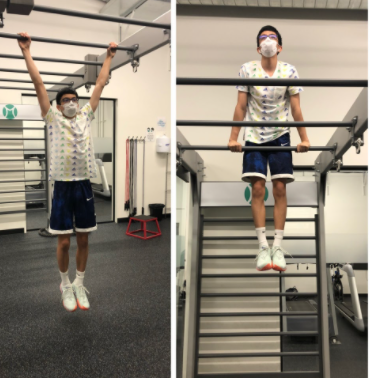
These are the third of the four fundamental exercises and they test one’s upper-body strength. Once again, there are countless variations to the pull-up, as we will discuss below.
Typewriter pull-up
This is a more advanced variation of the traditional pull-up, and is a great way to build strength towards the one-arm pull-up. With this variation, you essentially do a pull-up and then move your body side to side so each arm becomes extended. Be sure to consistently train both arms, to make sure you can do this on both sides.
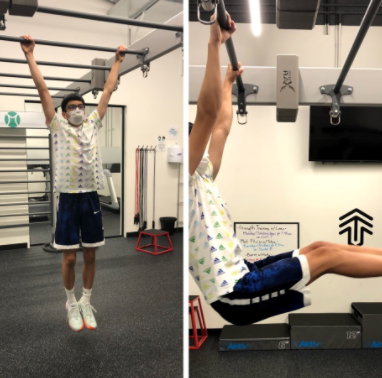
The muscle-up
This exercise has been my biggest calisthenic goal from day one. The muscle-up is similar to doing a pull-up (pulling one’s chin over the bar) and a dip (pushing up from the bar). It requires the right technique and explosive pulling strength. Currently, I can only perform these with pull-up assist bands.
Abdominals:
Knee raise
This is a great starter exercise to build the basic core, lower back, and hip strength to prepare for more advanced abdominal exercises. Start by hanging roughly shoulder width apart from the bar, and bring both your knees up to your chest in order to complete a rep.
L-Sit
Although it may look easy, this requires a good deal of core strength in order to suspend your legs at a ninety-degree angle. If this is too difficult, try starting with your knees bent and progress by extending your legs out in front as you gain strength.
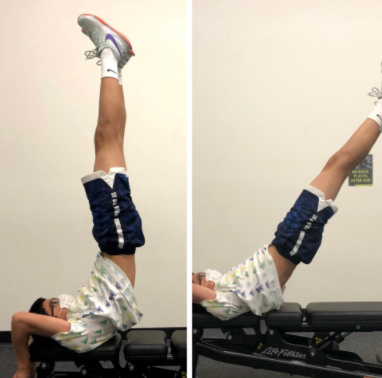
Dragon Flag:
This is another exercise I am still working on, and it requires a lot of core strength and body coordination. I am yet to complete a full rep as I can’t come all the way down (parallel with the bench) without my core giving out.
Legs:
Squat
This is the fourth and final fundamental calisthenics exercise. In order to perform a squat, imagine sitting on a chair, but suspending yourself in mid-air at a ninety degree angle.
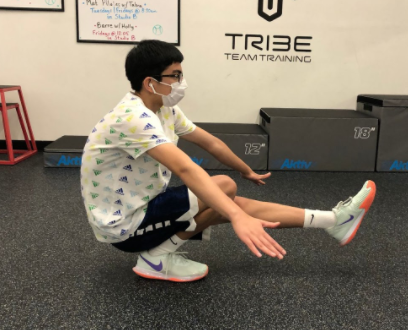
Shrimp squat
This is a one-legged variation of the traditional for added difficulty. Start in a standing position, bend one knee up to your glutes, and come down with the other as a one-legged squat. Come down until the bent knee touches the ground and come back up to perform a rep.
Pistol squat
This is essentially the closest one can get to performing a one-legged squat. This exercise not only requires strength, but ankle mobility in order to have full range of motion when performing it.